
Layering Fields
Allows you to layer fields on a project. Example: If you have several images on your project and you are overlapping them to create a collage, you can use these buttons to bring photos forward and back, allowing you to edit them.
-
Bring Forward: allows you to click an item and bring it one place forward.
-
Bring to Front: allows you to click an item and bring it to the front.
-
Send Backwards: allows you to click an item and bring it one place back.
-
Send to Back: allows you to click an item and bring it to the back.
Locking Fields
If there are fields you want locked in a certain position, this feature will not allow you to edit the item going forward. For example, if you have a frame with a picture and you do not want to be able to move it around, click the Frame and then the lock button.
To unlock, click the frame and then the arrow on the right side of the Elements Tool menu. Uncheck the box for “Freeze Locked Elements?”.
Removing Lines from Register Book Pages
Many register book pages contain lines for the fillable text to sit on. By default, these lines are 'locked' to the page, so that it's easy to move and adjust the text on them without worrying about moving the line as well.
If you prefer not to have the lines at all, there is an option to turn them off. This will need to be done on each page that has lines.
-
From the top menu Element Tools, click the small arrow at the far right. \
-
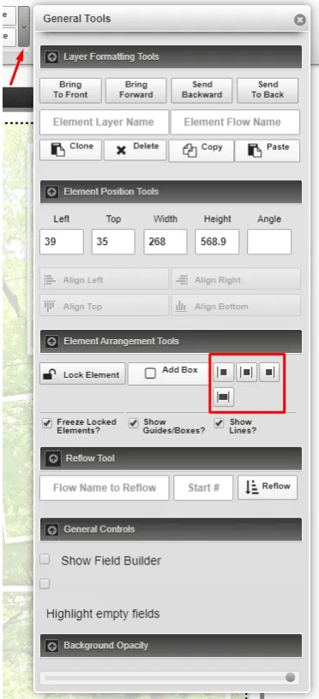
From the Element Arrangement Tools section, uncheck the box "Show Lines?"
-
Repeat for each page that contains lines.
If you are adjusting the layout or removing fields on a page, you may wish to remove or move the existing lines in the template.
-
From the top menu Element Tools, click the small arrow at the far right.
-
From the Element Arrangement Tools section, uncheck the box "Freeze Locked Elements?". This will unlock the lines and allow you to move or remove them.
-
Click on the line that you need to adjust - you can move it by clicking and dragging, or can remove it by clicking the delete button in the top menu
-
Once all adjustments have been made, re-lock the lines by re-checking the "Freeze Locked Elements?" box.
Aligning Fields
This function assists in aligning several items to the left or right, or to the same top or bottom.
-
Click and drag to select all fields you want aligned together. The buttons will become active above.
-
Click to select the alignment type you want to use.
To align fields to the center, the stationery item must have a bounding box (dashed line going around the edges of the stationery).
-
Select the field you want aligned (only one field can be selected).
-
From the top menu, from the far right of the Element Tools, click the small down arrow button to open the full toolbar menu.
-
From the Element Arrangement Tools section, click the center alignment button. This will align your field within the center of the bounding box.
Creating a Condolences Page integrating Book of Memories Condolences - for Register Books only
-
From the top menu, click the Insert > Add Page
-
Use the search box and enter the word “condolence”. Two options will appear.
-
Click the + sign for “Condolence Page – Reflow”.

-
One Condolence Page will pull as many messages as will fit on one page (typically 4 or 5, depending on the lengths of condolences left).
-
Make note of the number of the last condolence left on the page as you will need this to set up the next page. You can view this by clicking the last condolence on the page and it is shown in the Field Editor window that will appear.

-
To show the next set of condolence messages, add another Condolence Page - Reflow (following steps 1-3).
-
Open the Element Tools expanded menu (skinny gray arrow at the top right, beside the delete button). Look for the Reflow Tool section.
-
In the Reflow Name box, type in “condolence” (all lowercase)
-
In the Start box, type in the number of the next condolence message that you want to appear on the page (Example, if your last page ended with condolence 6, type "7" - meaning, on this page, start with the 7th condolence).
-
10. Click the Reflow button. The condolences on the page will reconfigure to showcase the next batch of condolences.
-
11. Continue steps 5 - 10 as many times as needed to reach the end of the condolence messages.

Adjust Background Fading
-
This will only apply to projects with a background image.
-
You can lighten and darken the background image by clicking the arrow to the right of your Element Tools menu and referring to the Background Opacity section.
-
Move the circle left-to-right to adjust the background.