
Most pages use the WYSIWYG editor within the main body, header and/or footer. This is the default module for all new pages and functions like Microsoft Word.
** When initially editing a page using this module, some code will appear for a brief time; this is the HTML generated by the module.
Enter any text you want to add to the editor.
** If you are copying and pasting from another source it is highly recommended to copy and paste into Note Pad first, then copy and paste into your Web page.
Below you will find a list of editing options with this editor.

Photos
Place the cursor where you would like the picture to display either on a new line (larger image) or at the beginning of a paragraph (text to wrap around a smaller image).
Select the Advanced buttons > click the Image icon.

A pop-up window will appear with the following options:
My Images
These images are currently loaded in the system. Scroll through until you find the image you need; click to highlight and click on OK.
Upload Image
Browse to the file on your computer and open. There are several ways to adjust the image:
-
Auto-resize large images – forces the image to be contained within the actual width of the page.
-
Auto-optimize to 60% quality – adjusts the quality of the image to make it faster to download (lower quality = faster download).
-
Change width to ___ pixels – use one of two sizes: 250 for smaller images if you want text to wrap around or 450 if the image is to appear the full width of the page. You can always shrink down once the image is on your page.
-
Change height to ___ pixels – the height will automatically adjust when width of image is changed (do not adjust both the width and the height otherwise the image will be distorted).
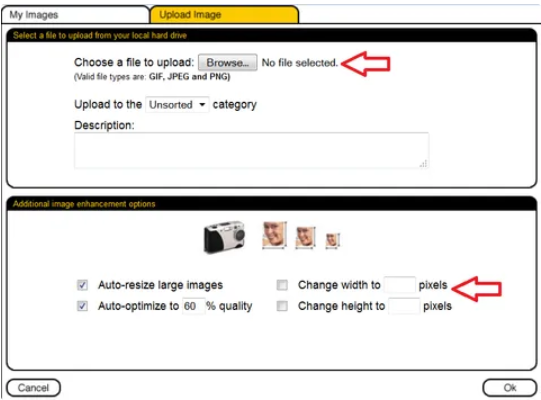
Image Properties
Once the image appears on your page, double click on it or right click to access > Image Properties.
-
Alternative Text: Add text to describe photo in the event that the image doesn’t display properly for online visitor and to help with search engine optimization.
-
HSpace: Add padding (pixels) to the right/left side of the photo (recommend 10) to create space between image and text.
-
VSpace: Add padding (pixels) to the top/bottom side of the photo. (recommend 10) to create space between image and text.
-
Alignment – select whether the image will sit on the right or on the left. This option is used when you have a smaller image on your page.

Linking
Create a hyperlink to another page on your website, an external website or email address, or a file.
Highlight text or a graphic to link and click on the Link icon in menu:

A pop-up window will open. Choose from one of the link options:
My Site
Link to any page on your website.
External or Email Link
Link to an email address or URL.
** When linking to an external website, check ‘Open link in new window’.
File from my Folder
Link to a file (ex: PDF). The file must first be uploaded into the system before linking to it.
If you need to edit the link once it’s created:
-
Right click the link.
-
Change the URL
-
Set the Target to determine how the link will open (ex New window (_blank) option will open the link in a new browser window).
To delete a link, highlight the link and click the icon to the right of the Link button in the menu.