
FrontRunner offers Quickbooks integration connections with Quickbooks Online and Quickbooks Desktop version 2016 or higher.
What You Need To Integrate
-
QB Company File Setup
-
QB Items (Products and Services) Setup. If you plan on pushing each individual product to it's on item in QB, make sure those items are also setup.
-
QB Web Connector for QB Desktop users. To see if you have this Open QB > Files > Update Web Services. If you do not see this, you can follow step 2 to download.
How Does Quickbooks Desktop Connection Work
-
FrontRunner (FRP) connects to a Web Connector (WC) which connects to Quickbooks (QB).
-
The WC is like a bridge platform.
-
When FRP pushes info to the WC, it's up to the WC to push the info to QB.
How Does Quickbooks Online Connection Work
-
FRP will connect dirctly to your QBO version via a login link.
-
Saving information in FRP will automatically update to QBO. It is a direct connection.
What Pushes To Quickbooks
When pushing information, keep in mind the names slightly change.
-
Deceased = Customer in QB
-
Buyer = Sub-Customer in QB
-
FRP Contract = Invoice in QB - when the contract pushes over to create the invoice in QB, there is a lot of flexibility for how the invoice will look/be structured.
-
Payments = Payments (undeposited funds)
-
Refunds = Checks (un-written checks)
-
Adjustments, Late Fees, etc.. will push to the item you have connected it to.
What Links Over From The Contract
The FRP connection will link your Contract Line Items to Items in QB Desktop. In QBO they are referred to as Products and Services.
We DO NOT connect directly to Accounts.
-
Items always sit under accounts in QB. If you do your reporting based on your account level information, you can still do your reporting after the connection is setup using your account information because the item will fall under the account and the account will take the total of whatever items are under there. You can go into QB and create an item underneath each account that we will link to.
To check for your item structure in QB Desktop:
-
Open QB Desktop
-
Lists
-
Item Lists
To check for your product and service structure in QBO:
-
Open QBO
-
Settings (gear wheel)
-
Products and Services
Item linking can be done in 4 different ways and can vary throughout the setup:
-
Link each individual line item from FRP to an individual item/product-service in QB.
-
Link entire sub-categories from FRP to an item/product-service in QB for a sub-total of that sub-category to push to QB.
-
Link the entire category from FRP to an item/product-service in QB for a sub-total of the sub-category to push to QB.
-
Link entire contract from FRP to an item/product-service in QB so that only 1 line shows on the invoice in QB.
Merchandise Break Out:
-
Group any casket selected, for example, to a specific line item in QB. Meaning ANY casket selected will show up as the same line item every time in QB.
-
Itemize each casket selected, for example, to its own item in QB so that detailed reporting can be done directly in QB.
Option 1 is more common because it's less setup required and there is already the reporting in your FRP system.
What FRP Items Need To Be Connected
Every contract line item needs to be represented by an item in QB.
Additional items to link:
-
Discounts (MUST be a 'Service' type item in QB, even if you already have a Discount type item within) - go into your QB list items and make sure it's set to Service.
-
Adjustments - will push as a line item on the invoice.
-
Late Fees - will push as a line item on the invoice.
-
Refund to Family - will push as a check.
-
On-the-fly Items - will push as a line item on the invoice. It is important these are set up to push over to QB.
-
Tax Rates - names link only, not the rates. Any rate changes need to be updated in QB and FRP.
We recommend opening your FRP system, open a record and go to the Contracts section to see all the line items currently setup.
How Does Information Get Pushed
Once the connection is officially activated, there will be a checkbox on the FRP contract screen called Updated Quickbooks on Save. When activated and the contract is saved, information will be queued to the WC.
On the Entry screen in the Accounts tab, there will also be an Update QB on Save checkbox AND a field for the QB Amount to Push to Invoice.
You will be able to setup automation for the WC to run or run it manually.
Setting Up the Integration for QBO and QB Desktop
Before you are able to use the QuickBooks Export feature, you must first integrate your QuickBooks account with the FRP system and set up the link configuration.
Steps For Quickbooks Set Up
Database Initialization
-
Login to your system and navigate to System Settings > Arranging Director Admin > Accounting Integration – QuickBooks Desktop > Configuration Wizard.
-
Make sure to have your FrontRunner system and Quickbooks open.
This step will already be completed for you when you first jump in to this area. It is part of the steps that FrontRunner will handle when initializing your connection. The completed message will read: ‘Initialization Complete!’
Click on the blue swirl button, located at the top, to return to the Configuration Wizard.
Web Connector Setup
You may already be in the Configuration Wizard screen but if not, navigate to System Settings > Arranging Director Admin > Accounting Integration – QuickBooks Desktop > Configuration Wizard.
You may already have the Web Connector (WC) within your Quickbooks (QB) program. To check:
-
Open QB.
-
Go to the File tab in top left corner.
-
Near the bottom would show Update Web Services. If you see this, you have the WC.
If you do not have the WC:
-
Click "test this connection".
-
Click Download QWC File.
-
A pop-up will appear asking to open or save the file. Save the file in an easily found folder on your computer since you will need to reference the file when the QB WC program is launched.
-
Open the folders on your computer to get to your downloaded file.
-
Right-click over the file > Copy.
-
Navigate to a folder on your computer > right-click > Paste.
-
-
Follow the link to Download and install the QB WC from the Intuit Marketplace Web Connector page. Save File.
-
Open the QB WC.
-
Click the Add an application button located at lower right hand corner and browse for the .QWC file saved to your computer.
-
Locate where you saved the file > open it.
-
A screen will soon display called ‘Authorize New Web Serve’. Click on ‘OK’.
-
A new screen will display asking you to authorize access. This will open within the FrontRunner (FRP) system. This step grants permission to Pulse to ‘talk’ to your QB system. We recommend selecting the option to allow access whenever QB is open. Click Continue > Done.
-
From the FRP system, click Show Me My Password.
-
Copy the password. Make sure not to include spaces.
-
-
Jump back over to the WC.
-
Paste your password in the field > Save.
-
Uncheck the Auto-Run box.
-
Jump back to the FRP system. Click Start Connection Test.
-
Jump back to QB > File > Update Web Services.
-
Wait or Click Update Selected. If your WC is setup to connect every 10 minutes (the default setting), you must wait 10 minutes to view/access updated information. If the automatic updates are not enabled, open the WC and select ‘Arranging Director QuickBooks Connector’ and then click the Update Selected button to run the connection manually.
-
Jump back to the FRP system. Click the blue refresh button in the top right.
-
If connection is successful, the message within Step 2 will read: QuickBooks Web Connector (.QWC file) has been installed on your desktop and the Test Connection was successful.
-
If connection was not successful, click on the ‘Test the Connection’ link again to resolve connection issues.
-
-
Click on the blue swirl button, located at the top, to return to the Configuration Wizard.
**If at any time you receive the Quickbooks QBWC Error 1039: There was a problem adding the application. Check QWCLog.txt for details.
This error is a Quickbooks error indicating that your WebConnector is no longer connected to your Quickbooks Company File. You will need to contact Quickbooks Support and speak with a level 2 support representative.
Tax Configuration
You may already be in the Configuration Wizard screen but if not, navigate to System Settings > Arranging Director Admin > Accounting Integration – QuickBooks Desktop > Configuration Wizard.
-
Click the Configure Taxes link.
-
Locate the appropriate tax setup information from your Quickbooks (QB) company file.
-
Note, if you have not set up your QuickBooks tax codes, work with your accountant to set up your your tax information in QuickBooks before proceeding.
-
-
To pull this information into your system from your QB company file, refer to bottom sections:
-
Click Update Item Query
-
Click Update Tax Code Query
-
-
Wait for automatic update (default setting of 10 minutes) or click Update in Web Connector (WC).
-
Once the WC communication is finished, go back to FrontRunner (FRP) and click the blue swirl icon at top right to return to the Configuration Wizard.
-
Click back on the Configure Taxes link.
-
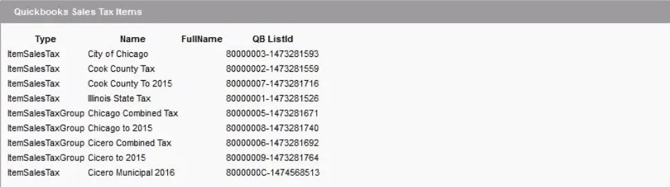
If you have tax items and tax codes set up in QB, they should be visible in the QuickBooks Sales Tax Items and the QuickBooks Sales Tax Codes sections.
-
If the tax items and tax codes are set up but are not visible, an error has occurred. Check the Quickbooks log and retry the steps above. If you still do not see the information, contact us.
Configure Tax Links
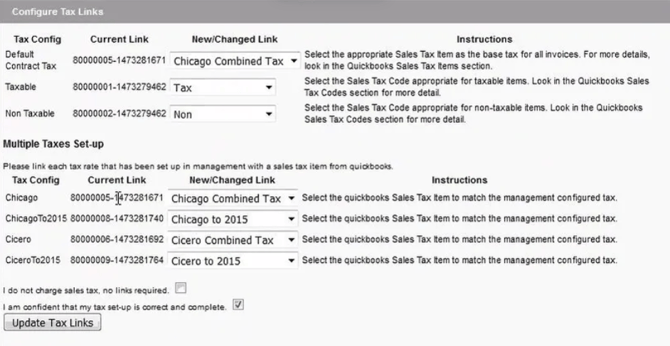
Tax Config
-
Base Tax - for Canadian clients only. Select the Sales Tax Code appropriate for taxable items. Look in the QB Sales Tax Codes section for more detail.
-
Taxable – Select the Sales Tax Code appropriate for taxable items. Look in the QB Sales Tax Codes section for more detail.
-
Non Taxable – Select the Sales Tax Code appropriate for non-taxable items. Look in the QB Sales Tax Codes section for more detail.
Multiple Taxes Set-Up
-
If your FRP system is set up with multiple tax rates (See Sales Tax Setup for more information) you will now link each FrontRunner tax group rate with each of your Quickbooks tax group rates.
-
NOTE TO CANADIAN CLIENTS: The Canadian version of QB does not utilize the Base Tax Item. Leave this set to establish link.
-
-
Click Update Tax Links.
-
Once you are confident that your taxes are set up properly, check the box to confirm that your tax set-up is correct and complete.
Click on the blue swirl button, located at the top right, to return to the Configuration Wizard.
Miscellaneous Configuration
You may already be in the Configuration Wizard screen but if not, navigate to System Settings > Arranging Director Admin > Accounting Integration – QuickBooks Desktop > Configuration Wizard.
This Miscellaneous Configuration set-up is only needed for a small percentage of clients.
Click the "configured here" link.
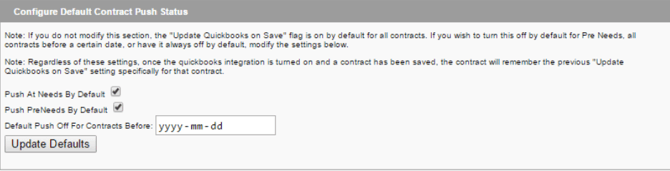
Configure Default Contract Push Status
As a default in your system, both at-need and pre-need contacts will all have the “Update Quickbooks on Save” enabled on the contract screen for a record. This will automatically queue any contract, customer and payments to the contract to Quickbooks (QB) once saved. You may adjust your default setting to automatically have the “Update Quickbooks on Save” disabled for at-needs and/or pre-needs. This will allow you to manually check off the “Update Quickbooks on Save” for particular contracts to be queued for QB.
You may also set a default date for pre-peed and at-peed contracts to start queuing items to push to QB only after that day. This date may be the official date that you are configuring your QB Integration and have reconciled your account. It is only optional to enter a date.
Please note the following when setting up a default contract push date:
-
If you do not modify this section, the “Update Quickbooks on Save” flag is on by default for all contracts. If you wish to turn this off by default for Pre Needs, all contracts before a certain date, or have it always off by default, modify the settings below.
-
Regardless of these settings, once the quickbooks integration is turned on and a contract has been saved, the contract will remember the previous “Update Quickbooks on Save” setting specifically for that contract.
Configure Information Settings
Checking this box will enable pushing the same Arranging Directory contract line item (e.g. Visitation) to different QB items (e.g. Burial Visitation, Cremation Visitation) depending on the service type selected. If you select this option, then on the Contract Line Configuration screen, you will enter a default link for the Arranging Director line item, but then will also be given an option to override that link for any service types for which you want the link to be different.
Click Update Settings if you check the box.
Configure Accounts Receivable
If you only have one Accounts Receivable account, then you do not need to set your A/R Account.
If you run multiple Accounts Receivable accounts from your QB, you will need to set up the Miscellaneous Configuration.
-
Scroll down and click Update Account Query.
-
Open up the Web Connector (WC).
-
Click Update Selected.
-
Go back to the FrontRunner (FRP) system and click the refresh icon in the top right to refresh your screen.
-
Your list of Accounts Receivable accounts from QB will be populated. For each item, refer to the New/Changed Link drop down to select the A/R Account that you would like the QB to use.
-
When done, click Update A/R Link.
Note, if you move invoices to a different A/R Account in quickbooks, the integration will not be able to find that invoice to update or apply payments.

Configure Contract as Grand Total
This section is if you wish your contracts to push to QB as a single line item (or possibly two if some items are taxed and some are not).

-
Refer to the New/Changed Link drop down and choose the category.
-
Click Update Contract as Total Link.
Configure Branch Classes
You should only fill in this section if you have classes set up in QB, and the intent of those classes is to segregate information by branch.
-
Scroll down and click Update Class Query.
-
Open up the Web Connector (WC).
-
Click Update Selected.
-
Go back to the FrontRunner (FRP) system and click the refresh icon in the top right to refresh your screen.
-
Your list of branches/classes from QuickBooks will populate to the Quickbooks Classes section of the screen. For each item, refer to the New/Changed Link drop down to select the branch/class you want QB to use.
-
When done, click Update Branch Classes.

Contract Line Configuration
You may already be in the Configuration Wizard screen but if not, navigate to System Settings > Arranging Director Admin > Accounting Integration – QuickBooks Desktop > Configuration Wizard.
-
Click Configure Contract Items link.
-
You will see all the contract line items. You want to link your FrontRunner (FRP) line items with a line item in Quickbooks (QB). You can also group certain sections together.
Configure Additional Line Items
This section is for any on-the-fly line items that are added to a contract. There are two options:
-
You can link the main line item.
-
Click Show All to show all the sub-sections in FrontRunner and link each line item.
Configure Discounts
This section is for any discount line item that is added to a contract.
-
From Quickbooks, make sure your Discount is setup as Other Charge.
-
From FrontRunner, select which Quickbooks account you would like to link it with.
-
If you have multiple Discount line items in FrontRunner, you may link each of them up to a different item within Quickbooks.
-
Click Update Quickbooks Link button.
-
Click your back button (blue icon in the top right).
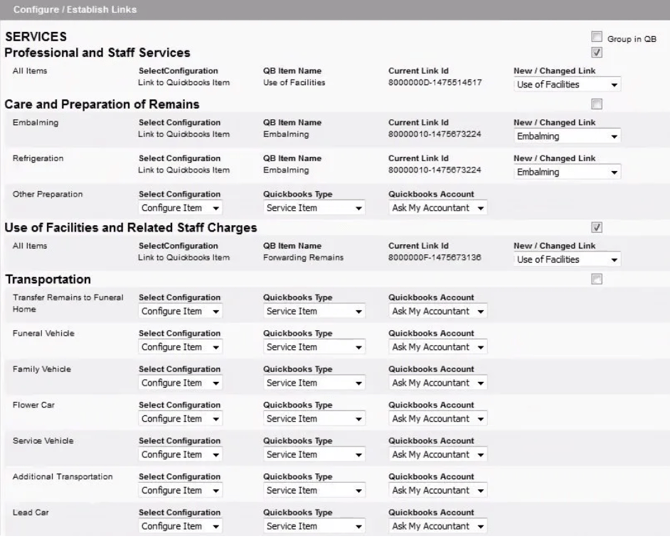
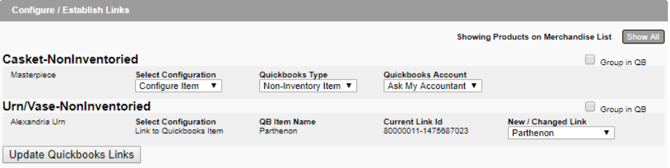
Configure/Establish Links
This section lists each non-product line item in your Arranging Director contract. The configured/relevant services will be pushed when you save a contract.
This section lists each non-product line item in your Arranging Director contract. The configured/relevant services will be pushed when you save a contract.
Each section will allow for two different configuration set ups:
Group Categories
By grouping categories you will be able to link all line items to the same item within QB. When the contract pushes over from FRP, the invoice within QB will only show the item it is linked to. No individual product reporting within QB can be done with this configuration, only general group reporting.
To set this up, click the Group in QB check box that will be on the right hand side of the section header.
Individually Link Items
By individually linking each item to a QB item, the contract information passing through to QB will showcase each line item. This option will give very detailed information in QB.
To set this up:
-
For each line item, refer to the Select Configuration drop down’.
-
The options are:
-
Configure Item – Choose the QuickBooks Type and the corresponding QuickBooks Account number:
-
Inventory Item
-
Non-Inventory Item (default)
-
Service Item
-
Other Charge Item
-
-
QuickBooks Link (Recommended Option) – If you do have this product set up in QB, then select this option and select the appropriate Item from the New / Changed Link dropdown. (The QB Item Name and Current Link Id fields will be blank if this is a new link.)
-
Once all relevant line items have been configured, click on the Update QuickBooks Links button located at the bottom of the list.
Configure Confirmation
Once you are confident that your line items are set up properly, check the box at the top to confirm that your items are setup correct and complete.
Click the blue swirl icon at top right to return to the Configuration Wizard.
Product Configuration
You may already be in the Configuration Wizard screen but if not, navigate to System Settings > Arranging Director Admin > Accounting Integration – QuickBooks Desktop > Configuration Wizard.
Configure / Establish Links
This section lists all products available in the Arranging Director contract; both shopping basket items and static line items. The shopping basket items are products in the FrontRunner (FRP) Catalog that are flagged as ‘Show on merchandise list’. If you wish to view all products in your FrontRunner Catalog, click the Show All button in the right hand corner. The product configuration page will be sorted to showcase Caskets, Urns, Vaults, Clothing, Additional Merchandise and static line items in sections.
Each section will allow for two different configuration set ups:
Group Categories
By grouping categories you will be able to link all Casket items (as an example) to the same item within Quickbooks. When the contract pushes over from FrontRunner, the invoice within Quickbooks will only show the item it is linked to. No individual product reporting within Quickbooks can be done with this configuration, only general group reporting.
To set this up, click the Group in QB check box that will be on the right hand side of the section header.
Individually Link Items
By individually linking each item to a QB item, the contract information passing through to QB will showcase a line item for each piece of merchandise and what that item is. With this configuration you will be able to more accurately run reports in Quickbooks showcasing products sold.
To set this up:
-
For each line item, refer to the Select Configuration drop down.
-
The options are:
-
Configure Item – Choose the QuickBooks Type and the corresponding QuickBooks Account number:
-
Inventory Item
-
Non-Inventory Item (default)
-
Service Item
-
Other Charge Item
-
-
QuickBooks Link (Recommended Option) – If you do have this product set up in QB, then select this option and select the appropriate Item from the New/Changed Link drop down. (The QB Item Name and Current Link Id fields will be blank if this is a new link).
-
Remember, FRP has the ability to run Casket, Urn, Vault, and Clothing sales reports. These reports will generate a detailed list of each product sold and which contract it was affiliated with, during a specified time period. The report will also generate an overall count during that time period. For more information view Reporting.
Once all relevant line items have been configured, click on the Update QuickBooks Links button located at the bottom of the list.
Configure Confirmation
Once you are confident that your product line items are set up properly, check the box at the top to confirm that your items are setup correct and complete.
Click on the blue swirl button, located at the top right, to return to the Configuration Wizard.
Account Entry Configuration
You may already be in the Configuration Wizard screen but if not, navigate to System Settings > Arranging Director Admin > Accounting Integration – QuickBooks Desktop > Configuration Wizard.
Configure Adjustments and Late Fees
The section will allow you to set up where Adjustments and Late Fees get linked to in Quickbooks (QB).
Note: If you do not link Adjustments and Fees to a QB item, they will not push to QB. This is for Adjustments and Fees, in the Account screen of a record, that will be shown on the QB contract.
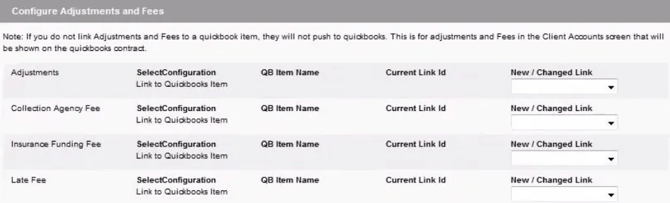
By individually linking each item to a QB item, the contract information passing through to QB will showcase each line item. This option will give very detailed information in QB.
To set this up:
-
Refer to the New/Changed Link drop down and choose one of the following:
-
If this does not apply to you, do not establish link by leaving the drop down set to "establish link".
-
Choose the item to connect with QB.
-
-
Click the Update Account Entry Links button.
Configure Refunds
This section will allow you to set up where “Refund to Family” payment entries, from the Account screen within a record, will connect to in QB. These items push over as Credits to QB.
Note, If you do not link Family Refunds to a QB Bank Account, then family refunds will not push to QB. If you have multiple A/R Accounts, you will need to choose one on the Misc Configuration screen (next step).

To set this up:
-
Refer to the New/Changed Link drop down and choose one of the following:
-
If this does not apply to you, do not establish link by leaving the drop down set to "establish link".
-
Choose the bank account where refund checks are issued out of.
-
-
Click the Update Account Entry Links button.
Configure Payment Methods
This section will allow you to set up where the payment types will connect to in QB.
Note, you can link as few or as many of the payment methods below as you like. Any which are not linked will push through to quickbooks without a Payment Method specified.
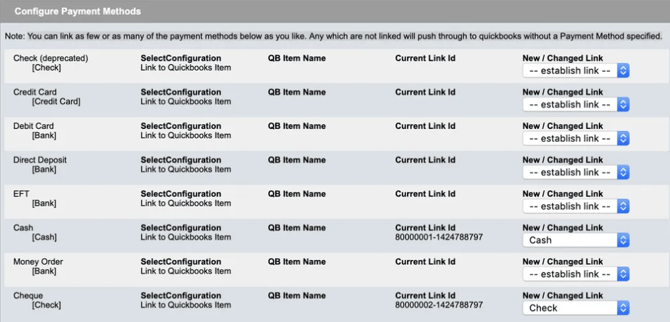
To set this up:
-
Scroll to the bottom and click Update Payment Method Query.
-
Open up the Web Connector and click Update Selected.
-
Go back to the FRP system and click the refresh icon in top right to refresh the page.
-
Refer to the New/Changed Link drop down and choose one of the following:
-
If this does not apply to you, do not establish link by leaving the drop down set to "establish link".
-
Choose the payment item to connect with QB.
-
Note, if you would like to adjust your payment methods in FRP, you can do so within the Data Setup section of your system.
Click on the blue swirl button, located at the top right, to return to the Configuration Wizard.
Set-up Verification
You may already be in the Configuration Wizard screen but if not, navigate to System Settings > Arranging Director Admin > Accounting Integration – QuickBooks Desktop > Configuration Wizard.
You will see this step when all of your items are setup.
-
Check the box to confirm that the integration steps are setup and you are ready to push invoices and payments to QuickBooks.
-
Click Confirm Set-Up Complete
Once the set-up has been verified, whenever you save a contract, it will schedule the contract to be pushed to QuickBooks as an invoice.
Using the Quickbooks Integration
Based on your configuration set up, you may have set At-Need Contracts to “Update Quickbooks on Save” automatically. This means that new contracts will automatically be flagged to push to QB when saved.
If this was not enabled, you will have the opportunity to check off the "Update Quickbooks on Save" when ready.
In order to push (or re-push) a contract over to QB, the "Update Quickbooks on Save" must be checked on. Then you will hit the save button.
If you are not wanting the contract to push to QB make sure the "Update Quickbooks on Save" is not checked.
Should wish to change your default contract push settings, for At-Need and/or Pre-Need Contracts, please visit the Miscellaneous Configuration Step in your Configuration Wizard.
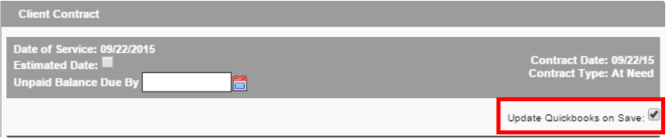
This checkbox also controls whether future amendments to this account (changes to the contract, payments etc) will push to QuickBooks or not. If you need to de-activate the integration for a particular contract after the invoice has already been pushed through to Quickbooks (for example, if you had to manually adjust something in Quickbooks), you can disable this box at any time to turn off the integration for this client.
QB Online:
Once an item have been saved with "Update Quickbooks on Save" the invoice will automatically be pushing over to QBO.
You will receive a pop up message to say it was Successful. If you receive an error, view the View Log to confirm the error in detail. This will mean the invoice did not push.
QB Desktop: Running the Web Connector
Once there is an item, or several items, saved from the FRP system, those items will sit on the WC.
-
You will need to open your WC to officially push the information to QB.
-
Click Update Selected.
If you wish to change how the WC is run, visit the Web Connector Setup page.
Making an Entry on the Account
When making an entry towards the account in your FrontRunner system, the entry screen will have additional options just for your Quickbooks connection.
Each time an entry is made towards a contract, whether it be a Payment, Down Payment, Late Fee, Additional Discount, or a Refund to Family, it too will be defaulted to “Update Quickbooks on Save” IF the Contract is already flagged as "Update Quickbooks on Save".
If using QB Desktop, the entry will be queued to push to Quickbooks until the Web Connector runs.
If using QBO, the entry will automatically push over to Quickbooks.
Should you wish to disable the entry from being updated to Quickbooks, you may disable the “Update Quickbooks on Save” prior to saving.
Entry Types
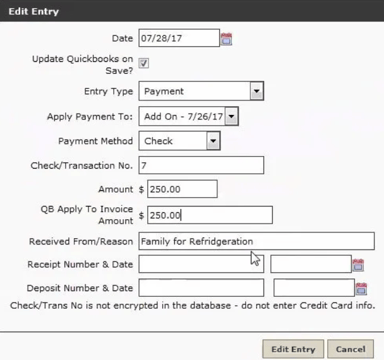
Payment & Down Payment Entries
These entries will be pushed as undeposited payment entries in Quickbooks. By default these entries will be applied to the Customer and not the Invoice. If you want to ensure money is connected and paid to the invoice, fill out the protion to be applied in the "QB Apply to Invoice Amount" before saving.
Adjustment & Late Fee Entries
These entries will push as line items on your Quickbooks invoice. You may establish which item in Quickbooks it links to under the Configuration Wizard Step 3b. Contract Line Configuration.
Refund to Family Entries
These entries will push over as an un-written Check in Quickbooks. In order for these to successfully push over, you will need to configure the bank account in which these will be connected to. You may establish this in the Configuration Wizard Step 3b Contract Line Configuration.
‘Amount’ and ‘QB Apply to Invoice Amount’
When making an entry it is important to remember that although in FrontRunner you can make entries greater than the Contract Amount, Quickbooks does not allow an Invoice to receive payments great than it.
Therefore your entry screen will give you the flexibility to apply a certain portion to the Invoice (if needed) and the remaining balance will just get added to the Account. As a default the amount you enter to the ‘Amount’ field will also pre-populate to the ‘QB Apply to Invoice Amount’. Only in the situations when you cannot apply the full amount to the Invoice you can adjust.
This will allow payments larger than the Contract Amount or Amount Due to be entered into FrontRunner and successfully push over to Quickbooks.
Once the entry is saved, your entry is document on the Accounts tab and will indicate whether or not the "Update Quickbooks on Save" was flagged. The QB: Y | N status does not mean that it has successfully pushed over.

Quickbooks Sequence:
The Quickbooks integration works in a sequence that can often help you determine the cause of an error. The following is the order that item(s) are queued to Quickbooks:
-
Customer Add
-
Customer Modify OR Invoice Add
-
Invoice Modify or Payment Add
-
Payment Modify
Quickbooks Log
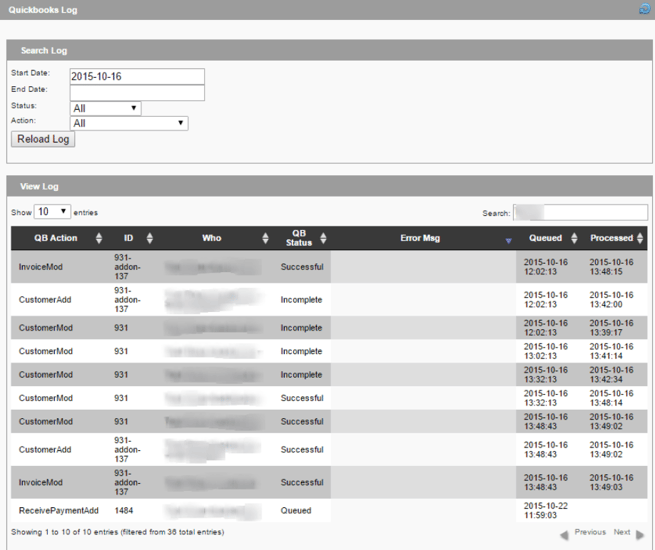
The Quickbooks Log, found under System Settings > Arranging Director Admin > View Logs, will show you all transactions and information that have been saved on the FRP side.
If using the QB Desktop and Web Connector the View Log will showcase any transactions that are Queued to the WebConnector. To officially push the items to QB you will need to run the WebConnector.
If using the QBO version, all transactions are automatically pushed to QBO so nothing will show Queued.
The View Log will detail all transactions, dates and statuses.
** It is highly recommended you view this if not everyday, every other day until you are comfortable with the integration.
-
QB Action = Action being made from FrontRunner.
-
CustomerAdd = New Customer (deceased) Added
-
CustomerMod = Previous Customer (deceased) Modifications
-
InvoiceAdd = New Invoice/Contract Added
-
InvoiceMod = Previous Invoice Added being Modified
-
ReceivedPaymentAdd = New Payment Added
-
ReceivedPaymentMod = Previous Payment Add being Modified
-
-
ID = Unique ID code per Customer (deceased)
-
ID may also include if the particular QB Action is being made towards a Contract Add-On.
-
-
Who = Customer (Deceased) or Sub Customer (Buyer) Name
-
QB Status = Real time status of QB Action
-
Queued
-
Successful
-
Error
-
-
Error Msg = Description of QB Action if QB Status received error. View Error Message Codes for more information.
-
Queued = Time stamp QB Action was originally queued from FrontRunner
-
Processed = Time stamp the QB Action’s was updated from Web Connector
Message Codes
1039: There was a problem adding the application. Check QWCLog.txt for details.
This error is a Quickbooks error indicating that your WebConnector is no longer connected to your Quickbooks Company File. You will need to contact Quickbooks Support and speak with a level 2 support representative.
3000: The given object ID “***” in the field “list id” is invalid.
The most likely reason for receiving this error is that a product or contract line item has been added to the contract which has not been linked.
How to fix:
Products and line items must all be linked in order for them to push properly. See the Set Up guide for assistance.
3060: There was an error when converting the quantity “1” in the field “item quantity”. QuickBooks error message: You cannot set the quantity for items of this type.
An itemDiscount type Quickbooks item has been linked for your discount lines. Quantities are fine for Quickbooks items, except itemDiscount items. itemDiscount items have a quantity field attached to them (even if you have not entered a quantity or percentage), and that is what is causing the error.
How to fix:
You will need to delete the itemDiscount in Quickbooks that you currently have linked, and create a new item for Discounts in Quickbooks that does not have a quantity attached to it. You will need to then re-link the new item by following these steps. Once that is complete, you will want to re-save the records affected and then update the Web Connector (or let it run if you have it set to auto-run).
3120: Object “****-***********” specified in the request cannot be found
A payment is attempting to be applied to an invoice which is no longer in Quickbooks.
How to fix:
You will need to manually enter the customer, invoice and payments into Quickbooks. You will need to disable the Quickbooks integration for this particular record by unchecking the box in the upper right hand corner of the Contract screen for ‘Update Quickbooks on Save” and manually enter payment information into Quickbooks going forward.
3120: Object ********-**********” specified in the request cannot be found. QuickBooks error message: Invalid Argument. The specified record does not exist in the list.
An invoice, customer or product has been deleted from Quickbooks that the invoice is attempting to link to but cannot. The Quickbooks item to be linked no longer exists.
How to fix:
You will need to manually enter the invoice, customer or product into Quickbooks.
3140: There is an invalid reference to QuickBooks Account “Ask My Accountant” in the Item Non-Inventory. QuickBooks error message: Invalid argument. The specified record does not exist in the list.
You are receiving this error because you have products linked to ‘Ask My Accountant’, instead of a Quickbooks product/item. It could also be that you have deleted the ‘Ask My Accountant’ item from Quickbooks.
How to fix:
All of your products should be linked to a Quickbooks product/item. You will need to go back into your Configuration Wizard to update the links for the products currently set to ‘Ask My Accountant’.
3150 – There is a missing element: “TxnID”
A payment is attempting to be applied to an invoice that has not been posted to Quickbooks yet or has failed to post to Quickbooks.
How to fix:
You will need to manually enter the customer, invoice and payments into Quickbooks. You will need to disable the Quickbooks integration for this particular record by unchecking the box in the upper right hand corner of the Contract screen for ‘Update Quickbooks on Save” and manually enter payment information into Quickbooks going forward.
3176: A related transaction object specified by the ID 25F37-1447175810 is already in use, or failed to acquire the lock for this object.
This means that Quickbooks was unable to modify a related object. More than likely this is because the invoice that the payment is associated with, is open and being edited in Quickbooks. Under certain circumstances, the Web Connector is unable to write to something that is already being changed.
How to fix:
Close the file in Quickbooks, and then in your FrontRunner system, re-save the record in order to re-queue it. Either update the Web Connector manually, or let it auto-run.
3177: The transaction object “*****-**********” may only be provided once in this request.
There has been a linked payment towards the same invoice. A linked payment should only be set if there are multiple invoices (Contract and AddOn) AND the payment made needs to be split among the two invoices.
How to fix:
Within the Account tab, you will need to delete the payments that are linked and reenter than as separate payments towards the same invoice or linked payments between multiple invoices.
3180: There was an error when saving a Invoice. QuickBooks error message: The transaction is empty.
This means that the contract screen was saved with “Update Quickbooks on Save’ ticked, and without adding any items to the contract itself.
How to fix:
You will need to add the services/products to the contract and re-save. Update the Web Connector, or let it auto-run.
3180: There was an error when saving a Invoice. QuickBooks error message: This transaction action is not allowed for this user.
This means that the contract you are attempting to push is from a previous/closed fiscal year. FrontRunner will not push an invoice to a closed year.
How to fix:
Best to advise your Quickbooks controller or accountant. Journal entries are typically advised to be manually entered.
3200: The provided edit sequence “**********” is out of date
The invoice has been edited inside of Quickbooks and no longer matches the information from Arranging Director.
How to fix:
You will need to disable the Quickbooks integration for this particular record by unchecking the box in the upper right hand corner of the Contract screen for ‘Update Quickbooks on Save” and manually enter payment information into Quickbooks going forward.
3210 – The “AppliedToTxnAdd payment amount” field has an invalid value “$$$$$$”. Quickbooks error message: You cannot pay more than the amount due.
The payment total being pushed to Quickbooks is greater than the amount owing.
If you have manually added the payment already into Quickbooks, the payment you are attempting to push would be reading as an overpayment, which Quickbooks does not allow.
If you have not manually added a payment, there could be something on the contract that is not passing through to Quickbooks properly. If this Quickbooks total is less than the amount on the contract, then the payment being applied would be too high.
How to fix:
You will need to disable the Quickbooks integration for this particular record by unchecking the box in the upper right hand corner of the Contract screen for ‘Update Quickbooks on Save” and manually enter payment information into Quickbooks going forward.
Re-Pushing Entries
Should an item have generated an error when running the Web Connector to Quickbooks, you can re-visit the item, update and save for it to be re-queued in your log.
We have listed out common Error Message Codes to assist you in troubleshooting why an item did not successfully push to Quickbooks. Should the item have been a PaymentAdd, you can re-visit that payment entry in the Account tab of the associated record, fix the error noted if possible and save. Same goes with a Customer Add (deceased or buyer) or Invoice Add (contract). When the entry is re-saved, it will be re-queued to be pushed to Quickbooks when you run the Web Connector.
Updating Quickbooks Version
If you have recently updated your Quickbooks version, your data will no longer push over to Quickbooks, so you will need to re-connect the integration.
First, you will need a new QWC file. Quickbooks support can help to get this.
Once you are emailed the new file, you will need to follow these setup steps:
-
You will need to go into your Quickbooks company file.
-
Click File tab.
-
Click Web Services.
-
Click Update Web Services.
Quickbooks Setup and Maintenance
Navigate to System Settings > Arranging Director Admin > Financial & Quickbooks Setup and Maintenance.
-
Quickbooks – View or Modify Email Addresses and Account Name Values
This section allows you to view or modify the email addresses and bank accounts used when exporting data to Quickbooks.
-
Bank Account Name – enter the bank account name that is used in Quickbooks. The name must match exactly, otherwise, when the data is imported to Quickbooks, a new account and class will be created. Do not change these values unless you are absolutely sure they are correct.
-
Email Addresses to send Import Files – enter the email address(es) that you wish to receive the import files at.
-
-
Quickbooks – Maintain Class List
This section allows you to maintain a list of Quickbooks classes for check entry under Arranging Director > Financials > Account Register. You can find information about adding checks there.
To add a new item, click the plus (+) icon. Enter the account name, and click Add.
To edit an existing item, click the edif (paper) icon. Make your changes and click Edit.
To delete an existing item, click the minus (-) icon . You will receive a ‘Confirm Deletion’ popup. Click ‘Ok’.
-
Quickbooks – Maintain Deposit Account Name(s)
This section allows you to maintain a list of Quickbooks classes for check entry under Arranging Director > Financials > Account Register. You can find information about adding checks there.
To add a new item, click the plus (+) icon. Enter the account name, and click Add.
To edit an existing item, click the edif (paper) icon. Make your changes and click Edit.
To delete an existing item, click the minus (-) icon . You will receive a ‘Confirm Deletion’ popup. Click ‘Ok’.
-
Quickbooks Export Files
This section allows you to download files to export to Quickbooks.
-
Right click the file download icon to open the file you wish to download. (Quickbooks exports will be in the format required for importing into Quickbooks.)
-
For a Quickbooks export, save the file to your computer by clicking “File” then “Save As…”.
-
Make sure to select “Text File” as the “Save as Type” option and add or keep the file extension as .IIF
-
After saving, you may open Quickbooks and Import your saved IIF file.
-
-
QuickBooks Accounting Integration (Configuration Wizard)
Before you are able to use the QuickBooks Export feature, you must first integrate your QuickBooks account with the Pulse Management system.
Once the integration and configuration processes are complete, your firm will be able to:
-
Sync products and services with QuickBooks (if those are already set-up in QuickBooks).
-
Push products and services to QuickBooks (if those have not already been entered in QuickBooks).
-
Push invoices and any changes / updates of invoices to QuickBooks.
-
Push payments, adjustments, late fee’s, refunds and additional discounts to Quickbooks.
-
Push Add On Invoices and any payments, adjustments, late fee’s, refunds etc. to Quickbooks
What you will need for QuickBooks to integrate in the Pulse System:
-
Supported version of QuickBooks 2016 or later installed on your computer (we currently connect only to the PC version)
-
QuickBooks Company File
-
QuickBooks .QWC file (FrontRunner to provide)
-
QuickBooks Web Connector
-
You will also need to configure your taxes, products and service items in order to proceed.
-
Quickbooks Export
-
This section allows you to export transactions to Quickbooks.
Navigate to Arranging Director > Financials > Quickbooks Export
The QuickBooks Export will show all transactions that have not been previously exported.
-
Click the PDF icon in the upper right of the screen to show the list before the export is generated.
-
Click “Export these Transactions” to export a QuickBooks IIF file. The IIF file will be delivered via email.
-
-
A few notes about IIF files:
-
QuickBooks does not allow the import of voided checks via the IIF method. If you have a voided check, you will have an additional file mailed with the export information which contains the list of voided checks. These will need to be manually added into Quickbooks
-
QuickBooks IIF only allows the import of one split line for deposits
-