
Adding a Contract
Contracts are added in the "View Financials" area on a case. Clicking the “Add Contract” button in this area will create a contract for the case, bringing over all items selected from the Goods and Services step inside the arrangement form.

Adding a Blank Contract
Located under the View Financials area, the “Add Blank Contract” button will create a new contract for the case but not bring over any items selected from the Goods and Service step inside the arrangement form.

Editing a Contract
The "Edit" button will open up the edit contract screen which is used to make any adjustments to items on an existing contract, apply discounts and add additional items if needed.

Changing Item Details
Items shown on the Edit Contract screen can be adjusted if needed. Simply select the service or product that needs altering and then the “Pencil” icon positioned on the right hand side of the item.

A pop-up window will appear on screen showing the items details, from here the name, price, quantity and taxes can be adjusted. Once all changes have been done, click the “Save” button in the bottom right corner of the pop-up window to apply the changes.

Quick Add Items
The quick add bar located at the top of the Edit Contract screen is used to bring additional items into the contract that exist in your systems GPL. To bring an item in from your GPL start typing the item you wish to add and the system will use the type-ahead feature to suggest the item you are trying to add. Once found, click on the item to bring the item onto the contract.

Moving Items On The Contract
Items can be moved around in the categories on a contract. To move an item, simply click and hold your click on the item to drag and drop it where you want.
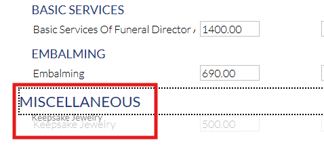
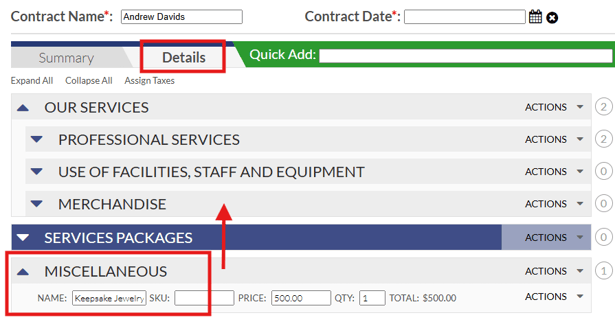
This is particularly important for items with no category that appear in a "Miscellaneous" category. If an item is in the miscellaneous category it will not appear on the generated contract and invoice documents. Items must be properly categorized. Simply click and move the item into the appropriate category to resolve this.
On the summary tab of a contract, only the categories for products added to the contract will show. If you need to move an item to a category that is not appearing, navigate to the "Details" tab where you will be able to move the item into any category from the GPL.
Change Item Taxes
To change the taxes of all items on the contract in one go, click on the "Details" tab beside the Summary tab which is located at the top of the Edit Contract screen.

Once on the Details tab, click the button titled “Assign Taxes” this will then bring a pop-up window onto the screen showing all items that are tax applicable as well as the taxes that are configured for you system. From here, taxes can be turned on and off for specific items or all of the items shown in the window.

Change Contract Date and Due Date
The Contract Date and Due Date are used to help calculate late fees within the system. Contract Date is the date that the contract was originally created. Due Date is the date that the account has to be paid in full.
**A contract date is required when creating a contract but a due date can be added later.
**A due date needs to be in place in order for late fees to apply to a contract.

Applying Discounts
To apply a discount to a contract, select the “Click Here To Add A Discount” button located on the right hand side of the Edit Contract screen.

Once clicked, the data input fields will appear. Give the discount a name, select whether the discount is to be a dollar amount or percentage, then fill in either the percentage/dollar value off. The discounts can also be applied before tax or after tax. If additional discounts are needed, at the right hand side of the discount input field there is a “+” icon, clicking this will add another line just below the first discount.

Adding Disbursements
Any disbursements selected on the Goods and Services step in the arrangement form will transition over to this area of the Edit Contract screen. If there is no disbursements already entered, you can add a disbursement by clicking on the "Click here to add a disbursement" button on the right side under the disbursements heading.

This will add a name and amount field for you to enter your disbursement. If you need to add additional disbursements, click the plus icon to add a new field.

The pencil icon will allow you to edit a disbursement and the garbage can icon will delete the disbursement.
Voiding a Contract
Once a contract has been voided no more documents, payments or edits can be made to it. The contract will show a "Voided" status and cannot be restored once it has been voided. The contract will still show in the contract list and you can still view what was on the contract, but other then that it is unusable once voided. To void a contract select the contract you wish to void, then click the “Void Contract” button located in the upper right of the View Financial interface.

Locking a Contract
When a contract is built and ready to start taking payments, the contract needs to be “Locked” this will tell the Web-Based system that the cases contract now needs to appear on A/R and Outstanding Contract reports. When a contract is locked, any additional changes needed have to go through the Alterations area. To lock a contract, highlight the contract and click the "Lock" button.

Once locked, the status of the case will now turn to “Outstanding” from “Active” which means that a balance is still needing to be paid. Once the contract amount has been fully paid, the status on the case will change to “Paid In Full”.
Alterations On a Contract
If a contract has been locked and further additions have to be made. These items have to be added through the Alterations area. To access the alterations area, start by clicking on the locked contract then select the “Alterations” button.

Once selected the alterations pop-up window will appear asking whether you want to add a new product, alter an existing product or add a discount.

When entering in a new product, give the item a name, a category that the new product belongs to (e.g. merchandise, service, transportation) a price, a quantity, select whether the item is taxed or not and who the payer of the item will be.
When altering an existing product type in the name of the product you wish to adjust, the system will use the type-ahead feature to suggest what item you are trying to alter. Once selected, adjust the price accordingly by either entering a negative number to reduce the cost or a positive number to increase the cost.
When adding a discount give the discount a name, select whether the discount is to be a dollar amount or percentage, then the fill in either the percentage or dollar value off. Once all alterations have been completed, click the “Save” button in the bottom right hand corner of the screen.
Payments and Refunds
The payments and refunds area of the system can be accessed in one of two ways. Either through the “Payments” button at the top of the case summary page or by clicking the “Payments and Refunds” button located in the upper right hand corner of the View Financials area.


Once either button has been clicked the payments and refunds pop-up window will appear on your screen.

Adding a Payment
To apply a new payment, simply click the green “New Payment” button. This will change the payment and refunds pop-up window to allow you to enter in information about the payer, how much they would like to pay, what day the payment was received, how the payment is to be received and who received the payment. Once this information has been completed click the “Save” button in the bottom right hand corner of this window.

Adding a Refund
To apply a refund, simply click the green “New Refund” button. Enter the name of the person receiving the refund, the amount, the date the refund is to be issued and how the refund is to be given. Once all the information has been entered in click the “Save” button in the lower right hand corner of the screen.

Editing a Payment
If information regarding an already exisiting payment needs to be altered. Simply select the payment you wish to adjust then click the “Edit” button. This will change the payments and refunds pop-up to display the details of the payment. Once the necessary edits have been made select the “Save” button in the bottom right hand corner.

Generating a Receipt
A receipt can be generated for each specific payment. To do this, select the payment you wish to generate a receipt for and click the “Generate Receipt” button. The interface will change to display the available receipt templates that can be generating in your system. Select the template that best suites your needs. Once selected click “Select Template” to start generating the receipt. The receipt will now appear in the financial documents area on the View Financials area.
Payers
Information about the payers entered can be found under the payers tab on the payments and refunds pop-up window.

This screen will display the name of the payer, how much they paid and the payers address. Additional payers can be added on this screen by clicking the green “Create” button, this will add data fields to enter in details about the new payer. If there is already a payer created, the information about that payer can be adjusted by selecting the payer and clicking the “Edit” button. This will bring up the same data input fields as if a new payer was created except certain fields will already be filled out depending on what information is already available for the payer. If a payer is needed to be removed from this list, simply select the payer that needs to be deleted and click the red “Delete” button.
Discounts
Under the discounts tab any existing discounts will automatically be shown here. If additional discounts are needed they can be added by clicking the “+” icon located to the right hand side of the discount.

This will add another line to enter in the new discount. If no discount has already been created by this point, the verbiage “Click Here To Add A Discount” will be shown on this tab. Clicking this verbiage will show a new line to enter a discount
Late Fees
If late fees are setup in the system another tab will be visible where the late fees are calculated for the contract. On this tab, the annual percentage rate, the due date and the grace period is displayed. The late fees are automatically calculated on the contract but they can be overridden by selecting the “Override Late Fees” button this will allow you to manually enter in the amount for the late fee rather than the system calculating it.

Generating Financial Documents
To add financial documents start by selecting a contract from the contract list, then click the green “Add Document” button. This will then display a list further down the section of financial document templates you have available to generate.

Simply select the document(s) that need to be generated for the case and a checkmark will appear to notify that the document has been selected to generate.

Once all documents have been chosen for generation, click the “Generate” button. The information from inside the arrangement form will now begin to populate the documents. If you want to generate the document with your letterhead on the document, select the "Generate with Letterhead" button.

A status of “Pending” will show that the document is in the state, once ready the status will change to “Complete”. Select a document when ready and click the “Download” button this will download a copy of the document in docx format to your computer.

If you have made changes to case information or contract information and need to re-generate the document, highlight the document and click the "re-generate document" button. This will override the previous version of the document with a newly generated version.
