
The Export, Import, and Synchronize functions of MiMS are located under the Database Menu within the main File Menu.
Sending and receiving of MiMS data records to or from a remote site is achieved through three utilities: Export, Import and Synchronize. The idea behind this feature is to help multiple site funeral homes maintain one central site where an accurate account of all business is achieved. As you can imagine, there is a vast amount of information to deal with in MiMS, and it could become very time consuming to enter it into multiple sites. The chance for typing errors would be compounded exponentially with the number of cases.
**In the event that you are handling a Trade Call the Export and Import features could also be used to send or received information about the decedent to or from the other funeral home.
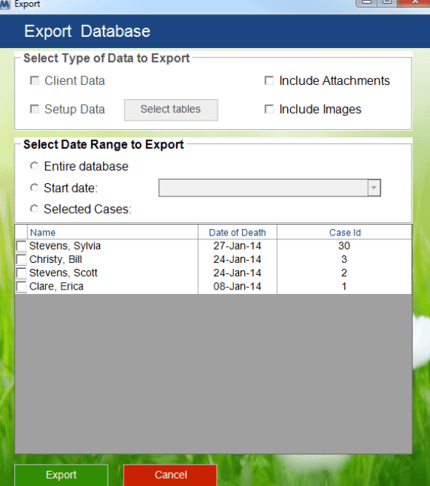
Exporting Data
Export is for copying some or all of your MiMS data to send to a different database to merge with. Click on the Export button and the Export window will open.
Importing Data
Import is for combining data sent from a different database into the existing database.
Click on the Import button and the “Import Database” selection window will open. In this window you are to find and select the file to import.
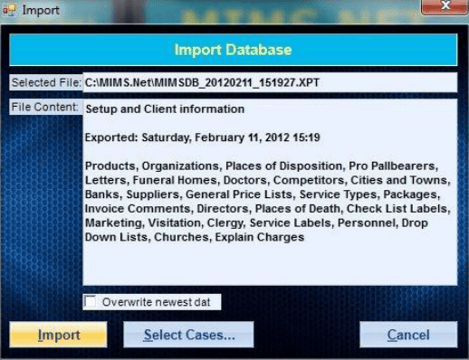
After selecting the file the Import window will appear.
Import Window
The Import window has several different areas on it.
Selected File: This area displays the location and name of the selected import file.
File Content: This area displays information about the import file like the data it was exported.
Overwrite newest data check box: The check box is so that in the off chance you do desire to replace data in the local database with older data.
Import button: The Import button is what you click on when you are ready to import the data.
Select Cases…: The Select Cases button opens the Select Cases to Import window to select specific cases to import.
Select Cases to Import Window

The Select Cases to Import window has many things you can do within it.
Most of the window is taken up with the list of cases in the import file. The left side of this data is the cases inside of the import file and the right side displays information if a case already exists inside of the database.
If a case already exists the box for checking to import will also display in blue.
Select All, Select New, Invert Selection, Clear All buttons: These buttons are to help you in auto selecting the cases in the list.
Case Details button: This button will load the Case Details Window with information regarding the highlighted case in the list.

When finished selecting the cases to import click on the “Import” button and the system will begin importing the cases into the databases.
Synchronizing Data
The synchronize function is designed to allow you to merge data from 2 MiMS databases that are on the same network.
Click on the Synchronize button and the Synchronize window will open to the “Synchronization – Select Database” window.
Synchronization – Select Database Window
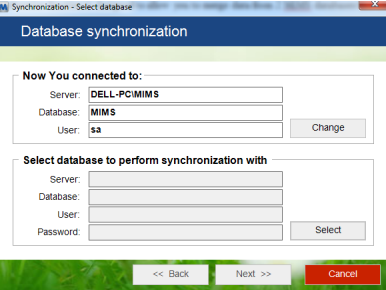
This initial screen will default the local database in the “Now You connected to:” information area.
In the “Select database to perform synchronize with” section you can either type in the information for the second server or use the Select button to access a “Database Server” connection window.
**The User is “sa” and the Password is “mimsnetdb” for all MiMS databases.
After connecting to the second database you will be taken to the “Synchronization – Select Type” and Information window.
Synchronization – Select Type and information Window

Select Type of synchronization section
In the “Select Type of synchronization” section you select which of the 3 types of synchronization: Just Copy data of new
Cases, Full, or Partial.
If you select the new Cases option then you also get to choose if the data is from your current database, the second (external) database or both.
If you select either Full or Partial then the bottom section for “Select Information to be synchronized” will become available.
Select Information to be synchronized section
In the “Select Information to be synchronized” section you choose which of the 2 types of data you would want to copy in the MiMS database: System and Setup Information, or Case information.
If you choose the new Cases or Full options when you click the “Next” button you will be taken to the final window “Synchronization – Launch”.
If you choose the Partial option you will be taken to the “Synchronization – Select Operations” window.
Synchronization – Select Operations
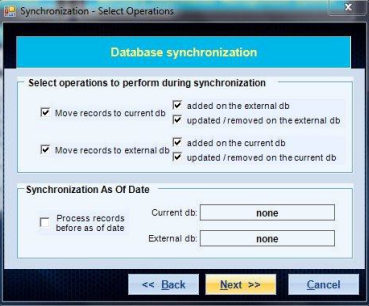
Select operations to perform during synchronization
In the “Select operations to perform during synchronization“ section you define in more detail specifically what data you want to copy or send between the 2 databases.
Synchronization As of Date
In the “Synchronization As of Date” section you can just say to only synchronize data for new cases.
Once you have made your selections click “Next” and you will be taken to the “Synchronization – Launch” window.
Synchronization – Launch

The “Synchronization – Launch” is you last chance to decide you want to proceed with the synchronization or not. Click the “Finish” button and the 2 database will begin synchronizing.