
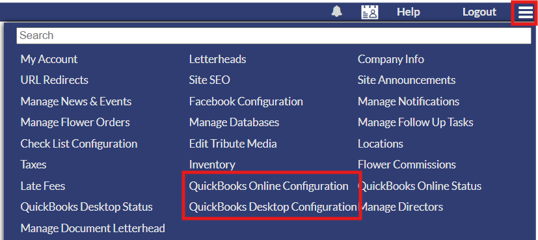
Family Arranger offers integrations for both QuickBooks Desktop and QuickBooks Online. To connect QuickBooks to your system, open then system menu by clicking the 3 horizontal lines in the upper right corner. Options are available in here for "QuickBooks Online Configuration" and "QuickBooks Desktop Configuration".
**If at anytime you run into issues with setting up your QuickBooks integration, reach out to Funeral Tech support for assistance at support@funeraltech.com.
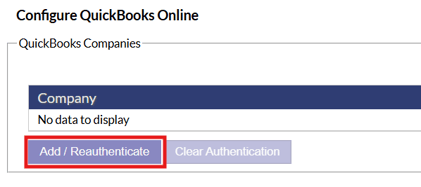
QuickBooks Online Configuration
The QuickBooks Online Configuration will allow you to sign into your QuickBooks account to connect to Family Arranger. To sign in simply click the "Add/Reauthenticate" button and sign in to your account.
Once you have signed into your QuickBooks account, you will need to add locations to your QuickBooks companies and configure your mappings to match what you have in QuickBooks.
**If you need assistance with this setup, reach out to Funeral Tech support at support@funeraltech.com.
QuickBooks Desktop Configuration
Perquisites For QuickBooks Desktop
- Quickbooks must be at least 2015 edition.
- Install QuickBooks Desktop. Note whether you are installing the US or Canadian version.
- Install the QuickBooks Web Connector (https://developer.intuit.com/docs/0200_quickbooks_desktop/0100_essentials/quickbooks_web_connector).
Initial QuickBooks Desktop configuration
Inside QuickBooks Desktop, add any products and accounts that you will require. You will, at a bare minimum, want the following items:
- An accounts receivable account (this should already exist by default).
- An account to deposit funds into (probably 'undeposited funds').
- An Account for discounts/credits.
- An Account (service, non-inventory part, or other charge) for disbursements.
- An Account for late fees.
- An Account to use by default for contract products.
- If using QuickBooks-calculated taxes:
- A tax for each tax in the CMS. The rates must match the CMS tax rates.
- A tax group for each distinct set of taxes that will be used in contracts.
- If using CMS-calculated taxes:
- A product for each tax and free-form tax in the CMS.
Integration registration
- In the backend of the CMS, open the top right dropdown, and click the 'QuickBooks Desktop Configuration' link.

- Record the password on the resulting page, and then click the 'Ok' button.

- On the next page, click the 'Download Web Connector QWC file' link, and save the resulting 'connector.qwc' file when prompted.

Web-Connector configuration
- Launch the QuickBooks Web Connector (this is simply labeled 'Web Connector' in your start menu) and Quickbooks if it is not already open.
- Click the 'Add an application' link in the bottom right.
- Select the 'connector.qwc' file that was saved in a previous step.
- Click 'OK' on the following screen and select Admin privileges on next screen.
- There should now be a row for the 'FuneralTech QuickBooks Integration' listed in the Web Connector. Enter the password saved in a previous step into the appropriate text input in this row.
- Check the leftmost checkbox in the 'FuneralTech QuickBooks Integration' row.
- Click the 'update selected' button.
- Wait for the operation to complete.
CMS basic mapping configuration
- Navigate back to the QuickBooks Desktop section of the backend of the CMS (or just refresh the existing tab if you still have it open).
- Configure the following items (these will autocomplete as you type):
- Country (this is the country of your QuickBooks Desktop installation)
- Accounts receivable
- Deposit Account
- Discount Item
- Disbursement Item
- Late Fee Item
- Default Product
- Select the tax strategy.
- 'Line Item per Tax (US)' uses products as taxes, with the calculations performed by the CMS.
- 'Tax Per Invoice (US)' uses QuickBooks taxes, with the calculations performed by QuickBooks.
- 'Line Item per Tax (Canada)` uses QuickBooks taxes, with the calculations performed by the CMS.
- Map CMS taxes to QuickBooks items
- Save the configuration
CMS detailed mapping configuration
- If there are any GPLs configured for the CMS, then there will be a tabbed pane at the bottom of the configuration page, which lists all of the items in each GPL.
- Each GPL item can be mapped to a specific QuickBooks Desktop product (these will autocomplete as you type).
- When a product is sent from the CMS to QuickBooks, the most specific configured mapping will be used. Unconfigured mappings (input boxes left blank) will be ignored.
Updating the list of available products
If you add new products or accounts to QuickBooks, they will not initially be available in the CMS configuration page. In order to make them available, click the 'Refresh QuickBooks Products' button, and follow the on-screen instructions.
Exporting To QuickBooks
Once QuickBooks is set up in your system, contracts can be exported to QuickBooks from the financials section on case summary pages. On the financials section of a case, click on the contract and utilize the "Send to QuickBooks Online" or "Send to QuickBooks Desktop" buttons to send the contract information to QuickBooks.
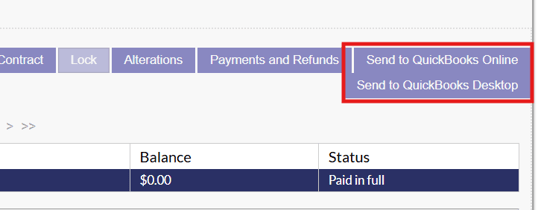
**It is important to note that in order for a contract to be sent to QuickBooks, it needs to be locked. If a contract is not locked, the QuickBooks buttons will be greyed out.
Alternatively, contract and payment information for a case can be sent to QuickBooks via the "QuickBooks Desktop Status" or "QuickBooks Online Status" pages. These pages can be accessed from the system menu, click the 3 horizontal lines in the top right corner to open the system menu. Both options are available in this menu section.
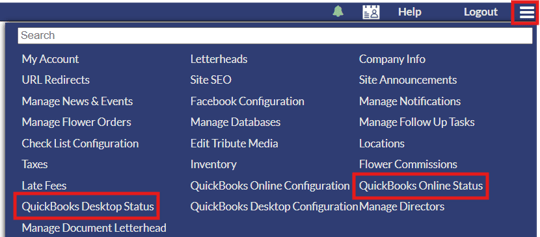
On these pages, any unsynchronized contracts will be listed out. Simply click the send button beside an entry to send to QuickBooks.
