
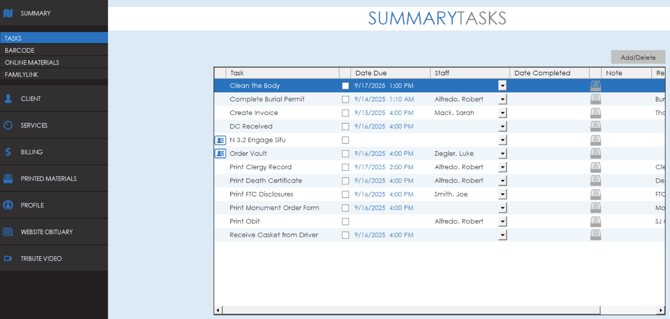
- Task name: title of task; what’s to be completed
- Complete: checkbox when completed; will date and time stamp completion; also pulls any reports or documents attached to this task when checked
- Date Due: due date assigned to this task; set up in E-View setup
- Staff: the staff member assigned to this task; may be changed from the dropdown
- Date Completed: will automatically be date and time stamped when completed box is checked
- Notes: click + to add any notes regarding this task
- Reports/Documents: any reports or documents that are attached to this task
Task Setup
Tasks can be setup and configured in the settings menu. Navigate to the settings page and then select the "Tasks" tab.

On the tasks tab, there are two boxes, one for the tasks associated to groups and one for the system task pool.

Task Pool
The task pool is a list of all tasks that currently exist in the system. These tasks can be assigned to groups or manually added to any case in the task tab. To add a new task, click the "New" button and a window will open where you can enter information regarding the task.

A variety of options are available on tasks to customize where they will be seen and what is connected to them. Tasks can be restricted by state or made default for branches via the state restriction and default staff options.

Documents can be added to a task which will trigger the document to generate and open when the task is opened on a case. Simply select a document from the drop down list and click add to add it to the task.

A rolodex item can be connected to the task through the rolodex item section. This will allow you to link the task to specific rolodex contacts or businesses that may be relevant to the task. Example, if you have a task to make arrangements with a local florist, you could link that florist to the task through the rolodex.

The date driven options allow you to set timelines for the task to be completed.

Along the bottom of the window, settings are available as well to hide or show the task in various areas such as the portal or profile in SRS, and an option is also available to have the task send out emails to the email list when the task is created on a case.

Tasks can also be deleted from the task pool by highlighting the task and clicking the "Delete" button.

Group Tasks
Tasks can be assigned to certain client groups to automatically be added to a case when the client type for the case is set to that group. At the top of the page you will see options available to select different types of cases or client types. The list of tasks assigned to that group will display in the group tasks list.

Tasks can be added or removed from the group task list by using the arrows in between the two list boxes.
