

The pages on the website are grouped under folders. Folders can be thought of as the category grouping that the pages are nested under. Folders will have a plus icon on the left side which you can click to view the pages listed that are under that folder.

The order from top down that the folders and pages are showing in is the same order that they will be displayed in on the navigation menu of the website. To move pages around on the navigation menu, you can drag and drop the folders or pages in this section to order them appropriately.
The three dots on the right side of a page or folder is where you can access the options and settings for that page. Edit design will take you to that page in the builder so you can edit the content, duplicate will make a copy of the page in the same folder, delete will delete the page from the system and settings will open up the page settings window.

Page Settings
Basic Page Settings

Page Name
-
Allows you to change the name of the page that displays in the builder and the navigation menu of the website.
Short Link
-
Allows you to create a shortened URL for the page that acts as a redirect. For example if the URL for the staff page is funeralhome.com/about/staff adding a short link of “staff“ would make a new URL for the page of funeralhome.com/staff. If a short link is added, both the default link and the short link URLs will go to the same page.
Show in Nav
-
This setting will toggle whether or not this page will display in the navigation menu. If a page needs to be accessible via direct link but needs to be hidden from the main website menu, this is the option to use.
Show in Footer
-
This setting will toggle whether or not this page shows in the footer menu options.
Hide Footer On This Page
-
This setting will toggle whether the website footer shows on this page or not.
SEO Page Settings

Page Title
-
Allows you to set the page title you want to display when your website page shows up in search engine results.
Page Description
-
Allows you to set the page description you want to display when your website page shows up in search engine results

Page MetaData
-
This section allows you to add custom html code to the page. Code that is added to this page will only apply to this specific page.
No Index
-
This setting will toggle whether or not the page can be indexed by search engines. Checking this setting means that the page will not appear in search engine results.
Social Page Settings

Alternate Social Sharing Image
-
The image added here will be the image that shows on social media posts when the link to this page is shared.
Page Title
-
The SEO page title is the page title that will show on a social media post when the link to this page is shared.
Page Description
-
The SEO page description is the page description that will show on a social media post when the link to this page is shared.
Page Types
There are twelve different types of pages that can be added to the website. To add a new page click the add new page button at the top of the pages section.

Standard
A standard page is a regular content page that gives a blank canvas to add any content elements and rows to in order to build out the desired page design. Most pages on the website will be this page type. Once added, you will be given an empty content section to begin filling with rows and elements.

Folder
A folder page will add a folder category to the menu that other pages can be listed under. A folder is not an actual page that can have content added, it is simple a menu category that other pages can be grouped under.
Link
A link page will add a page to the menu that will link out a certain url. This is not an actual page with editable content hosted on the website, it is simple a way to add a link to a website or phone number to the navigation menu. Once a link page is added, the url that the page links to can be set in the page settings. The link type can be set to external for a url on a different website, internal will let you link to a page on your website, anchor will allow you to link to an anchor point of a page that is on your website and click-to-call will let you add a phone number that is linked to dial once the link is clicked.

Blog
-
A blog page will add a page that has an editable area on the top half and a blog article area on the bottom half of the page that is not editable within the builder. The blog articles that display on the bottom half of the page are fed into this page by the blog articles added in the blog tool page in the admin dashboard. Any customization to the blog categories, information or photos showing in the articles part of the page would need to be edited from the blog tool page. The top half of the page will work as a standard page and have a fully editable content area where rows and elements can be added and edited.

Staff
-
A staff page, similar to a blog page, will add an editable content area on the top half of the page and a staffing section to the bottom half of the page that is not editable from within the website builder. The staff section is fed content from the staff tool page on the admin dashboard. To make any changes to the staff that are displaying or any of the content within the staff profiles, you will need to go to the staff tools page and make the changes to the staff member’s profile in there.

Events
-
A staff page, similar to the blog and staff pages, will add an editable content area on the top half of the page and an events section to the bottom half of the page that is not editable from within the website builder. The events section is fed content from the events tool page on the admin dashboard. To make any changes to the events that are displaying or any of the content within the event details, you will need to go to the events tools page and make the changes to the events in there.

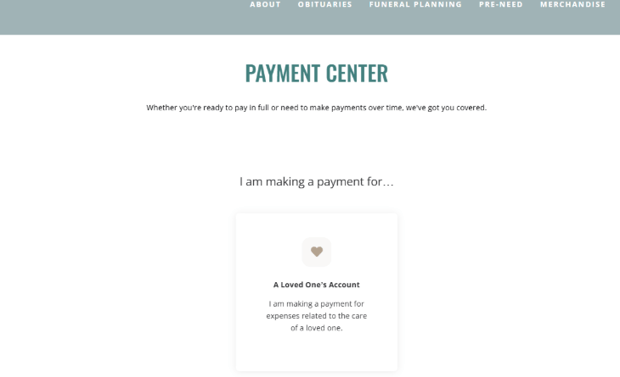
Payments
-
A payments page will add a payment center page connected to your Tribute Pay account. The credit card processing for this payment center works through Tribute Pay so a Tribute Pay account is required to use this payments page. Adding this page will add an editable content area on the top half of the page and a payment center section to the bottom half of the page that is not editable within the website builder. The payment center allows users to navigate through the various prompts to select a loved one, fill out basic information and proceed with a payment option.
Online Planner
-
The online planner page will add an editable content area to the top half of the page and an online planner section to the bottom half of the page that is not editable within the website builder. The online planner is configured via the online planner tool page in the admin dashboard. If you need to make any changes to the content and fields within the planner, you will need to go to the tool page to make those changes.

Merchandise
-
The merchandise page will add an editable content area to the top half of the page and a merchandise catalog section to the bottom half of the page that is not editable within the website builder. The merchandise catalog is configured via the merchandise tool page in the admin dashboard. If you need to make any changes to the content and fields within the merchandise catalog, you will need to go to the tool page to make those changes.

Testimonials
-
The testimonials page adds an editable content area on the top half of the page and a testimonial display section on the lower half of the page. The testimonials portion of the page is not editable within the website editor. If you need to make edits to the testimonials that are displaying, you will need to make those changes in the testimonials tool page of the admin dashboard.

Along with displaying the customer testimonials, there is also an interactive area where users can write a testimonial.

After they click the write a testimonial button, they will be prompted to leave a rating, name and message. The testimonial can then be approved in the testimonials area to be displayed on the website.
FAQ Page
-
The FAQ page adds an editable content area on the top half of the page and a FAQ section on the lower half of the page. The FAQ portion of the page is not editable within the website editor. If you need to make edits to the questions or answers that display in the FAQ, you will need to make those changes in the FAQ tool page of the admin dashboard.

Landing Page
-
The landing page will add a page to the website that does not appear in the main navigation menu. This page can be accessed by users via a direct URL short link. Landing pages are useful if there is a need to create a website page that is hosted on your website that you want to link to users but do not want accessible to the average user who is navigating your website menu options. For example, promotional pages or pages linked to marketing campaigns are use cases where landing pages work well. The short link for the page can be added in the page settings once the page is created.
 The page contains a contact us submission area at the bottom of the page and allows for content to be added above or below the contact us area. The contact us form on this page is not editable and will respect the global style settings.
