
On the case financials page, there are a few different sections available to edit or view various components of the contract or payments on the case.

Selections
The selections section will show any packages or items that have been added to the case. Any packages or items currently on the contract will be shown below the search section under the corresponding sections.

To add items or packages, simply click the products or packages tab up at the top of the selections area and click on the selections you want to add. Selectable items or packages can be filtered and browsed by category or searched for by name in the search bar.

Once a selection has been added to the contract, it can be edited or removed via the pencil or x icons on the right side.

In the edit window, after clicking the pencil icon, parts of the selection such as quantity or price can be edited along with togglable options for item tax and adding additional product information.

Below the selections area of the page, a purchaser can be added to the case along with an option to add a co-purchaser as well if needed. The purchaser will populate if they are already a contact in the system, if they are not though, click the plus icon on the right side to add their information into the system.

Financial documents can be generated below the purchaser area, there are options to generate a statement of account or a statement of funeral goods and services. A company logo can be applied to the generated documents via the statement logo dropdown and options are available for which sizing to generate the document in.

A summary of the financials can be seen at the bottom of the page, along with options to save the selections or save and post the contract. If contract changes may be needed as the case progresses, the contract should just be saved but not posted. Once the contract services have been completed and there is no further changes needed on the contract items, the contract should then be posted.

Once a contract is posted. the section at the top where selections previously were will now show that the selection has been posted. There are also options available here to export the contract to QuickBooks.

If there is a need to add an item to a posted contract, there is an add on option available on the far right corner.

Add-ons work the same as adding items to the initial contract, make your selections and a statement document can be generated at the bottom of the section for your add-on.
Once the add-on has been saved, it will appear in the overview section alongside the contract. The add-on will function similarly to the other contract in the system and can be posted once everything is taken care of for the add-on.

Discounts
The discounts section allows you to apply discounts to a contract. The contract or add-on you want to apply the discount to can be selected at the top of the section. Details such as name, amount and type of discount can all be added to the discount.

Once you add the discount, the discount will show up down below in the financial summary area and the new totals including the discount will be displayed.

Discounts can only be applied to contracts or add-ons that are not posted. If a contract is posted, you will see a message on the discounts screen that shows a discount cannot be added.
 Payments
In the payment section, payments can be entered into the system for posted contracts. To add a payment, simply add the payer name, amount and type of payment. once the details are entered click add payment to add the payment to the contract.

**In order for an insurance policy to appear as an option when insurance is selected as the payment type, the policy information must be added in the preneed section of the case.

A contract must be posted in order for a payment to be applied. If a contract is not posted yet, you will see a message that says the contract is currently unposted.

Once a payment has been added you will see the payment information in the financial summary at the bottom of the page, along with an updated summary showing the new remaining balance on the contract.

Reversals
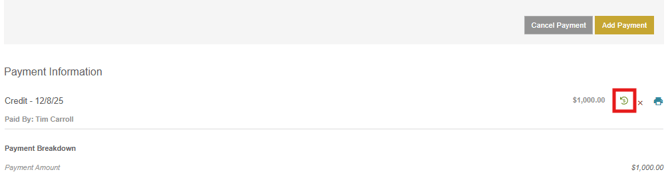
After a payment has been added to an invoice, the payment can be reversed if needed. To reverse a payment, simply click the reversal icon next to the payment on the payments page.
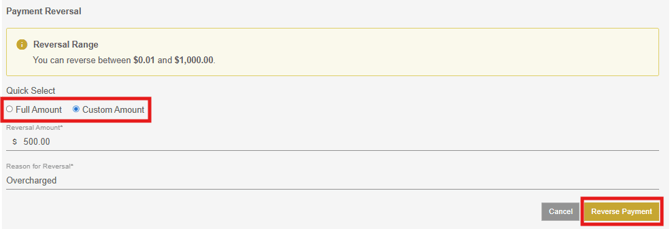
You will be taken to the payment reversal area where you have the option to reverse the full amount or custom amount of the payment. If custom amount is chosen, enter the amount in the "Reversal Amount" section. Add a reason for the reversal and click the "Reverse Payment" button.
Once you click the reverse payment button, a message will appear to tell you that reversals cannot be undone and asking if you are sure you want to continue. If you want to continue click the green yes button.

**It is important to keep in mind that even TMS support cannot undo a reversed payment so use this feature with caution, once a payment is reversed it cannot be undone.
If you need to print a receipt for the reversal, click the print icon beside the reversal on the payments page.

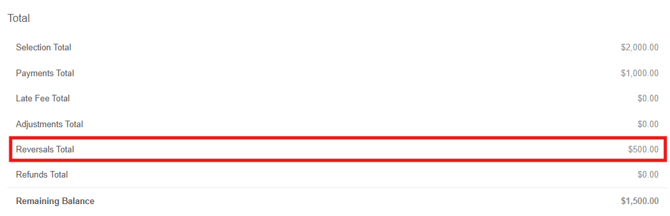
Any reversals on an invoice will also show as their own line item now in the invoice overview section.
**Reversals differ from refunds in the sense that the original transaction is voided or undone (typically before settlement). No new transaction is created. Refunds mean that money is returned to the customer after a successful transaction (a new outgoing transaction).
Reversals are available by default for users with Admin or Owner permission level. Staff level users can be granted access to the reversal feature through the user permissions, but the reverse payments permission would need to be manually toggled on for the user.
Adjustments
The adjustments section allows you to make an adjustment to the contract total. Enter the amount along with the adjustment type and click add adjustment at the bottom to add the adjustment. Adjustments can only be added to posted contracts. If you need to adjust a specific line item, check the line item adjustment box and a drop down will appear where you can select the specific item from the contract to apply the adjustment to.

If the contract is not yet posted, you will see a message that says the contract is currently unposted.

Once an adjustment is added, you will see the adjustment listed and the contract summary at the bottom of the page will show the new total and show the adjustment amount in the summary.

Refunds
The refunds section allows you to apply refunds to posted contracts. Simply add the name of the contact that the refund is for, add the amount, a description and click add refund. Once the refund is applied, it will display above the contract summary section. The summary at the bottom will also show the new balance and display the refund amount in the summary.

Refunds can only be added to posted contracts, if a contract is unposted you will see a message that says the contract is currently unposted.
**It is important to note that refunds in this section only apply to the case financial information. The payment side of the refund should still be issued to the contact outside of the system via the method of payment they used.